
React-native is a choice of many developers since it allows us to build cross-platform apps with an amazing ease. We at Stormotion stick to this programming framework as well.
React-native is often combined with Firebase — Google’s service to help us develop apps even faster and provide the users with the best UX possible.
One of the core Firebase features is a passwordless login. It allows the user to log into an app using only email. Yet, it’s quite challenging & time-consuming to develop such a complex system on your own. You need to create the server for sending emails, make sure you avoid the spam filter, send the dynamic link to the user, and correctly handle it inside the app.
It becomes even more complicated when you want to support the web version of your application as well. Gladly, Firebase allows us to get rid of the burdening boilerplate and simply sign the user in. That’s what we want, right?
You can take a look at the source code here.
To better understand this step-by-step guide, it’s preferable that you’re familiar with the basics of the react-native’s ecosystem and are able to build Android/iOS apps.
In this article, we’ll walk you through every single step so you can set up an app from scratch within an hour. In case you already have all the links and auth set up but something’s not working — go straight to step 9.
Versions:
Step # 1: Environment Setup
Before we start explaining this step, let us make a little sidenote. In case you already have the project installed, feel free to skip steps 1-3.
First things first, make sure you have the [node] (https://nodejs.org/en/](https://nodejs.org/en/){target=_blank rel="nofollow noopener"} installed. We recommend installing the LTS version to avoid all the problems.
For a way we suggest in our article, you’ll need a packet manager. In Stormotion, we prefer to stick with yarn, however, you can pick npm if you wish.
Step # 2: Project Setup
After completing step 1, you should set up a brand new react-native project. We recommend using TypeScript because it allows you to write type-safe code.
Before moving on, spend some time and check if you can debug it and know the app won’t crash because one of the values is null:
npx react-native init firebaseAuthTest --template react-native-template-typescript
Step # 3: Basic UI
Once you’ve created a project and performed pre-testing, you can set react-navigation up to make sure we can guide the user to the required screen. Here’s how you can do it:
yarn add react-native-reanimated react-native-gesture-handler react-native-screens react-native-safe-area-context @react-native-community/masked-view @react-navigation/stack @react-navigation/native
Don’t forget to run install the pods to make sure the dependencies are installed for iOS:
cd ios && pod install
To finalize installation of react-native-gesture-handler, add the following at the top:
import 'react-native-gesture-handler';
Pay extra attention to the place of it — it’s essential that it's at the top of your entry file, such as App.tsx, with nothing else before it.
You can skip steps 4 and 5 if you already have the navigation and screens set up.
Step # 4: Basic Navigation Implementation
The next step would be to init navigation and add the basic first screens.
In src/navigation/MainNavigator.tsx:
In src/screens/Login.tsx:
In src/screens/Home.tsx:
In src/screens/LoginFailed.tsx:
In src/screens/LoginEmailSent.tsx:
After you finish the step four correctly, you will have something like this:


Step # 5: Adding fancy UI
The next step is dedicated to adding some styles to that foundation we made in the step 4.
We also added the react-native-iphone-x-helper library to correctly style on iPhones and app-logo.png to src/images to add our logo to the login page.
In src/screens/Login.tsx:
In src/screens/LoginFailed.tsx:
In src/screens/LoginEmailSent.tsx:

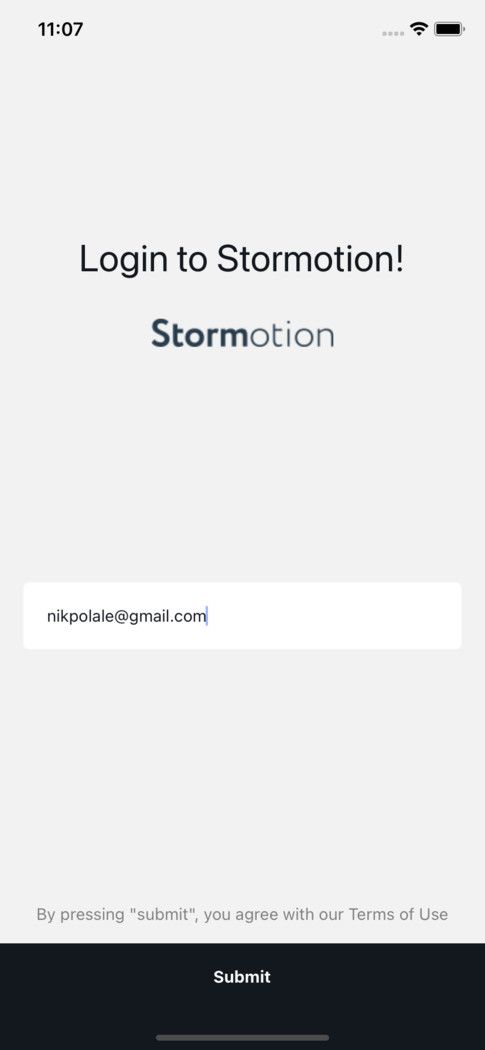
This is what it looks like after all style changes. Better, right? To be honest, there’s still much more we could do in our code to make it look better & more user-friendly: regexp to verify email, improve UI, improve performance by using useMemo/useCallback/memo, etc. However, it’s perfectly enough for the testing purposes.
The next step is integrating it with Firebase, which you can skip if you already have the firebase set right in place.
Step # 6: Adding Firebase
For this step, you should install react-native-firebase. In the next sections, we’ll talk about how to set react-native-firebase up for Android and iOS.
Step # 7: Adding Firebase Auth
Here, we are going to install the auth module by typing the following:
yarn add @react-native-firebase/auth.
Additionally, we need to install dynamic links to handle passwordless login:
_yarn add @react-native-firebase/dynamic-links. _
It’s important to remember to install pods afterwards. Unfortunately, it’s not enough to install the auth module to make passwordless login work. You need to make some steps to make it always work. Be careful because if you don’t follow the guide, you might have a hard time finding a mistake!
That’s why many businesses turn to React Native app development services to handle these detailed configurations efficiently.
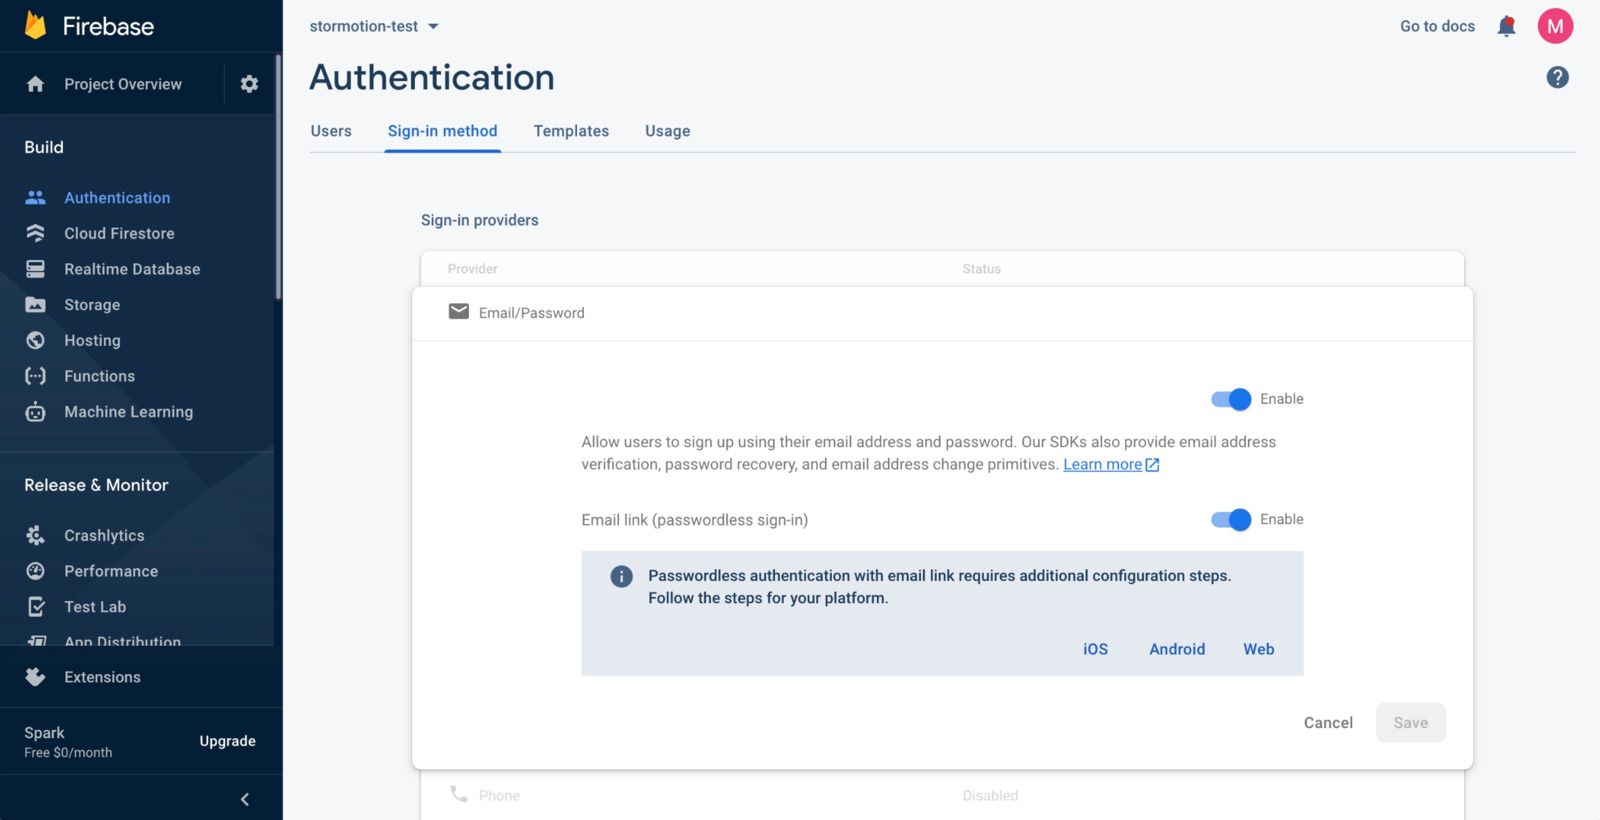
Step # 7.1: Enable passwordless login inside firebase


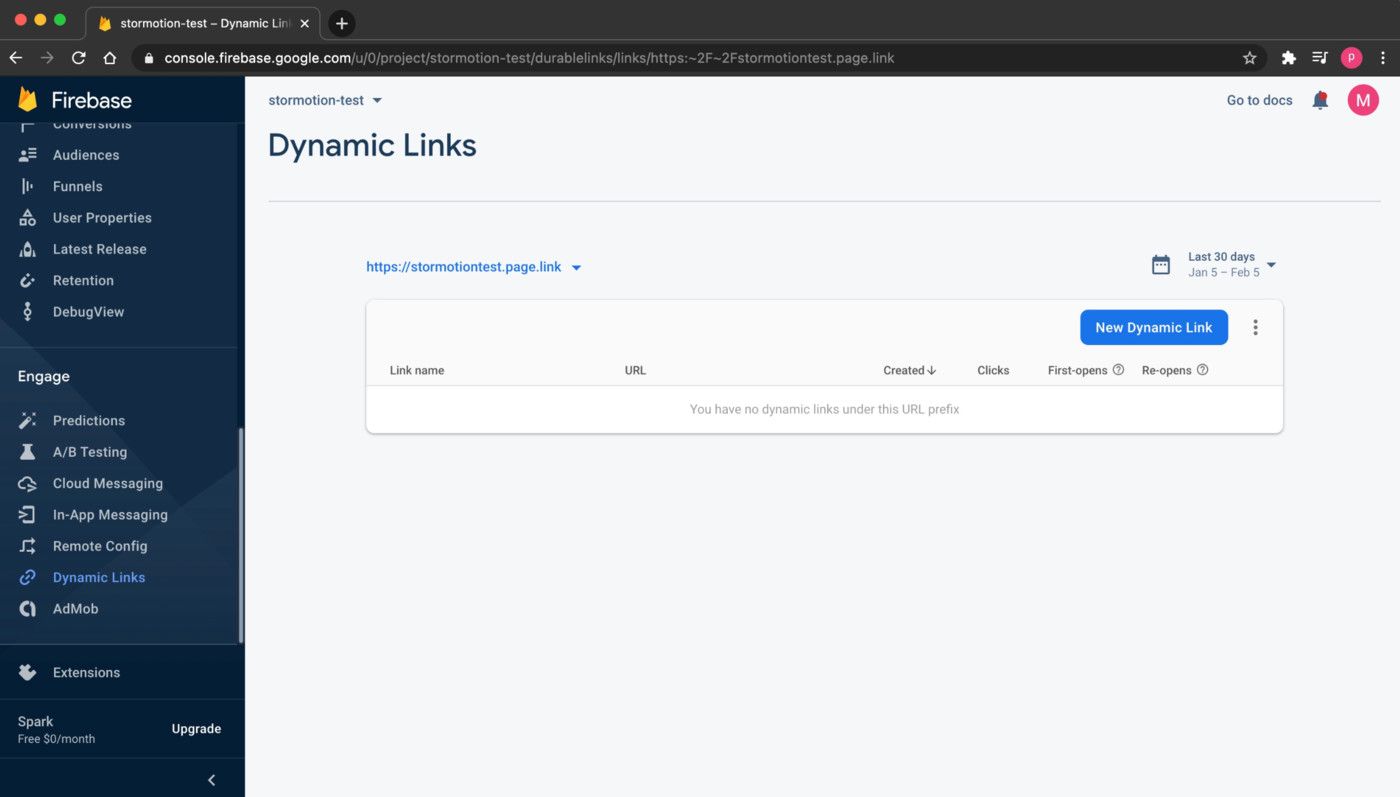
Step # 7.2: Enable Dynamic Links: iOS, Android
Once you’ve finished setting up the dynamic links for iOS or Android, it’s time to start writing the code.
In case you face any issues with this step, please take a look at the troubleshoot (step # 9) below and make sure you’ve done everything correctly.
Step # 8: Authenticating the User
Whenever we send a passwordless login link, we need to save the email between the log-ins, because Firebase doesn’t allow us to make it via the link without the email specified.
For our case, we’ll use AsyncStorage, however, for the real app you can use Redux+AsyncStorage, Apollo+AsyncStorage or Mobx+AsyncStorage — it depends on your use case. We need to add the library for that:
yarn add @react-native-async-storage/async-storage
Step # 8.1
You should update your Login.tsx to send the email with the passwordless link as well as your onSubmit function to send the sign-in link.
After that, proceed to replace placeholder strings with your relevant data and import auth from @react-native-firebase/auth
URL in our case is https://stormotiontest.page.link
If you’ve done everything correctly, you should receive an email with the link. (The project name could be changed in the settings).


However, if you press the link, a notification that you’re not authorized in the app will pop up.
To do it, you need to add a few hooks (it could also be done using the Class API, but we like the new more functional way).
Step # 8.2
Create src/hooks/useFirebaseLink.ts:
This code ensures that you catch the dynamic link and calls the onSignIn from useSignIn hook to make sure you log the user in.
In src/hooks/useSignin:
In useSignIn, you can sign the user in, and toggle the loading/error state.
Last but not least, you need to look at the loading state to make sure it’s possible to identify whether a user is logged in or. However, you’ll still
need to create a third hook for that.
In src/hooks/useAuth:
Finally, connect all the hooks in the MainNavigator, and show different screens based on the loading/error/user.
Please check the source code and let us know if you have any troubles.
Step # 9: Troubleshooting
1 - Make sure you have the dynamic link created


2 - Check if you added your dynamic links to the authorized domains for passwordless login.


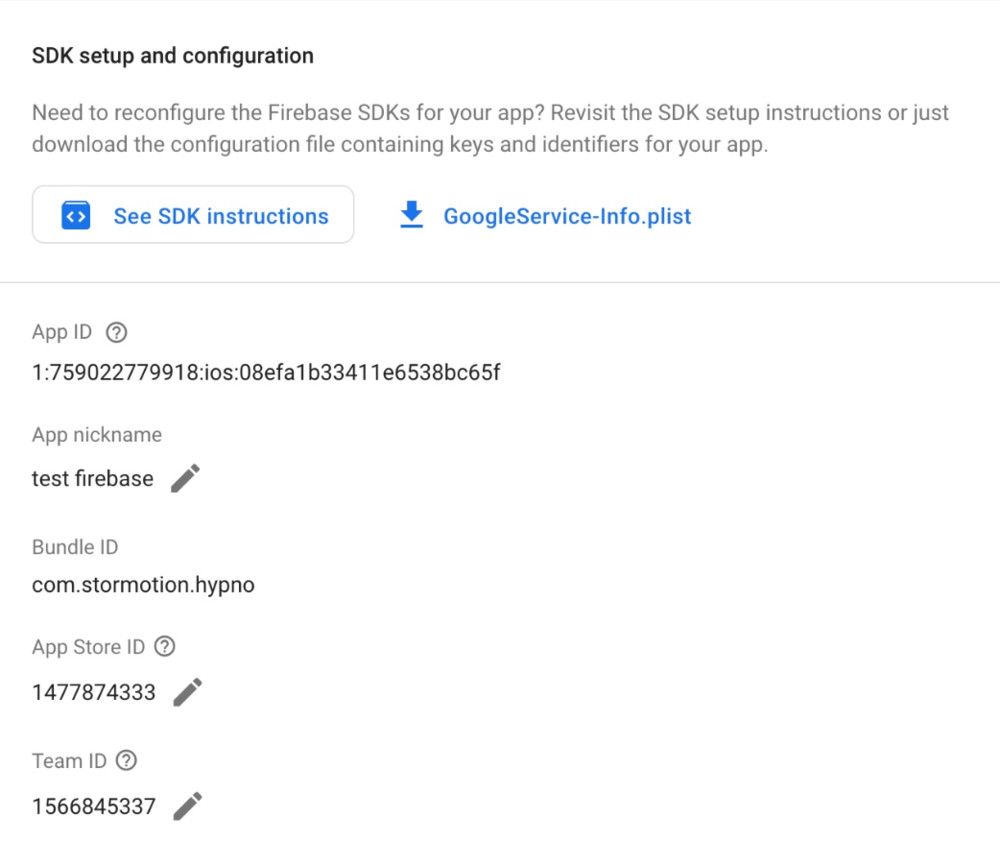
3 - (For iOS) Be sure you have the App Store ID, Team ID set


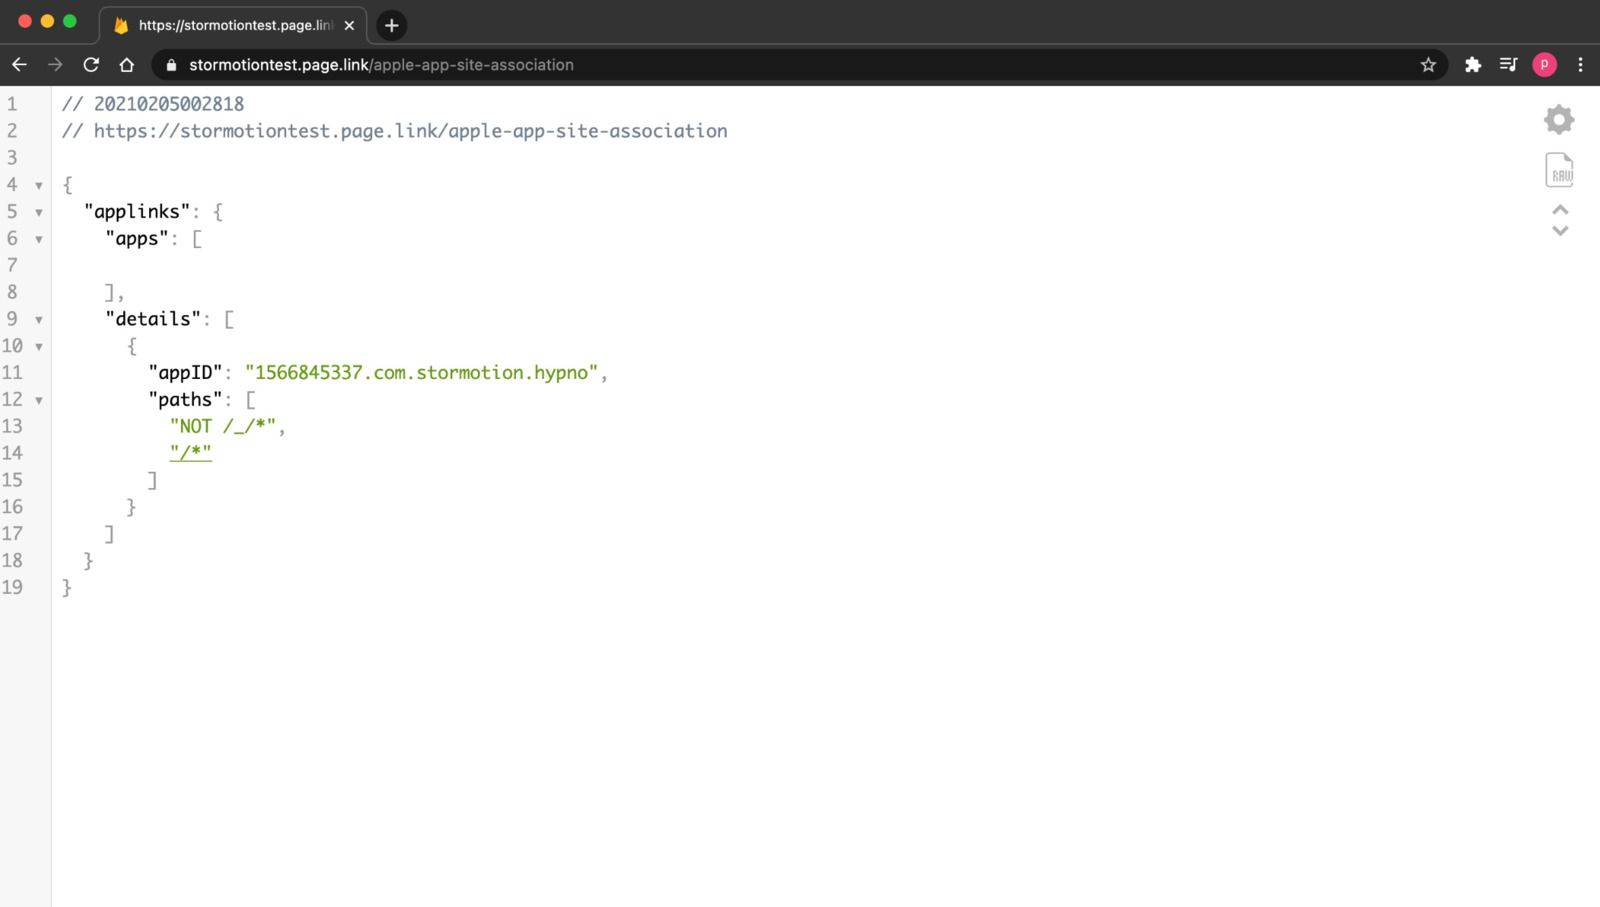
4 - (For iOS) - Check whether or not you have the https://link:apple-app-site-association working correctly. In our case, the link is https://stormotiontest.page.link/apple-app-site-association. It would be different in your case, but it should show a similar content (see below).


5 - (For iOS) - See if you have the associated domains set


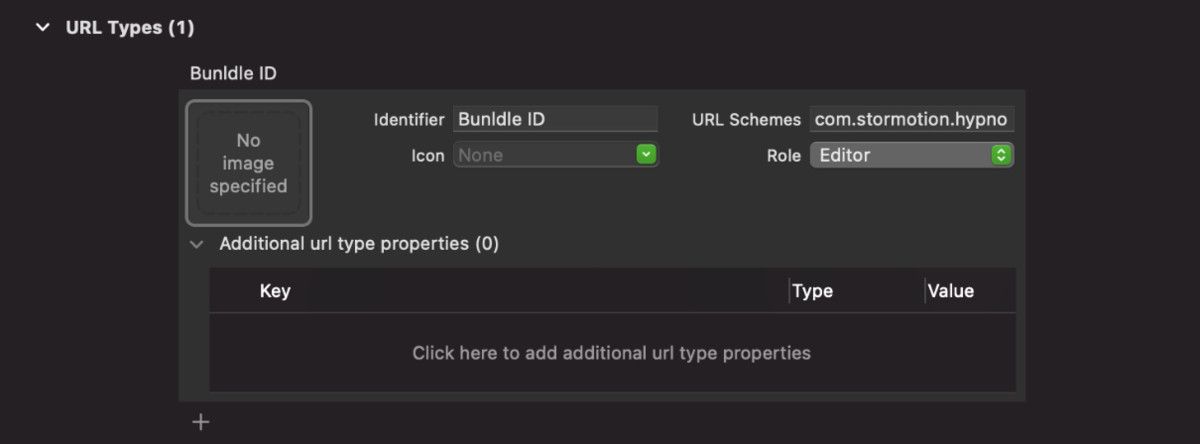
6 - (For iOS) - Make sure you have the URL type added with the URL schemes field, being equal to your bundle ID


7 - (For iOS) - You might have to reboot your device, unplug it, or reboot your mac. Please follow all of these steps in case none of the steps above help
8 - (For Android) - Sometimes the web browser can open itself for a second, and only then redirect you to the app. It means you haven’t set AndroidManifest up correctly. Consider adding this code:
9 - (Common) - Unfortunately, the dynamic links and passwordless login for react-native don’t work flawlessly all the time . For instance, it might break for react-native-firebase v6.
For more detailed information, you can visit this website
We don’t recommend relying on passwordless login as a single option for now. In case you have to deal with something similar, there’s not much you can do about it.
Use passwordless login wisely!

![Stormotion client David Lesser, CEO from [object Object]](/static/93e047dadd367691c604d8ffd1f54b58/1b3aa/david.webp)